Toddler Tips #934: Yogurt Reinvented

With each passing day, I find myself trying to solve some new challenge with raising four toddlers, aka “quaddlers”. They are a cunning lot who inspires a little ingenuity on my part (and George’s) just to manage day to day life. While my ideas are born from being surrounded by four toddlers, I think many of them could be helpful to any parents of little ones so I'm sharing.

With each passing day, I find myself trying to solve some new challenge with raising four toddlers, aka “quaddlers”. They are a cunning lot who inspires a little ingenuity on my part (and George’s) just to manage day to day life. While my ideas are born from being surrounded by four toddlers, I think many of them could be helpful to any parents of little ones so I’m sharing.

Being independent toddlers, the quads refuse to let me spoon feed them anything.   For the most part, it’s not a problem because they are highly skilled at finger feeding and are using utensils a little better each day.   Some foods such as applesauce and yogurt don’t lend themselves to finger feeding and aren’t ideal for novice utensil users.  This led me to find some alternative solutions, especially for yogurt.

20140304-140434.jpg

I snagged this little gem from Gwen’s Nest.  I put a little yogurt in the bottom of a bowl or plate and top it with dry cereal.  This is one of my favorite ways to serve yogurt because it helps the babies work on spoon-feeding themselves.  The yogurt sticks to the dry cereal, making it easier to scoop.  Sometimes they pick up the cereal as a finger food, and it’s a bit sticky, but it’s not terrible.

IMG_8814

I also found a recipe for Orange Dreamsicle Bites from Cookies & Cups, which used Greek yogurt and orange flavored Jell-O.  I experimented with it and found that other Jello flavors make tasty yogurt bites for the wee ones (and adults too!).  Plus, using other flavors creates fun colors, which is helpful when teaching toddlers about colors.  The best part- Greek yogurt transforms Jello-O into a snack packed with probiotics, calcium, and protein that is easy to serve and clean up!

You'll need just two ingredients to make yogurt bites: 1 1/2 cups Greek Yogurt 3 oz. box of Jell-O

You’ll need just two ingredients to make yogurt bites:
1 1/2 cups Chobani Greek Yogurt
3 oz. box of Jell-O

Note: I’ve experimented with various brands and flavors of Greek yogurt for this recipe, and Chobani vanilla results in the right texture.

Mix the yogurt and Jell-O in a microwave safe bowl

Mix the yogurt and Jell-O in a microwave safe bowl

Microwave the mixture 1 minute then stir well.  Microwave another minute then stir again.

Microwave the mixture 1 minute then stir well. Microwave another minute then stir again.

Spoon the mixture into molds, or muffin tins with cupcake liners.  If you use a mold, be sure to spray it with cooking spray first.

Spoon the mixture into molds, or muffin tins with cupcake liners. If you use a mold, be sure to spray it with cooking spray first.

I forgot to spray my mold and only two of our animals came out clean.  I found that mini muffin tins are just the right size for a snack, and clean up is easy.

I forgot to spray my mold and only two of our animals came out clean. I found that mini muffin tins are just the right size for a snack, and clean up is a cinch.  I made these as a toddler snack so I didn’t get fancy, but at Cookies & Cups, she topped these with whipped cream and candy, which would be cute to serve at a party.

I’ve been serving banana milk shakes for a while, but recently began adding Greek yogurt to them.  I also like adding yogurt to whole milk as a drink.  This is by far the easiest way to serve yogurt to toddlers!  I do this often for Mason and Sydney because they are so tiny and often need extra calories that are nutritious rather than empty junk food options.

IMG_8819

Toddlers absolutely LOVE dipping.  They recently discovered they joys of ketchup and sour cream so I began using yogurt as fruit dip for the quads.  Sometimes they spear fruit with a fork, which is good utensil practice.  They also do well just dipping fruit as a finger food.

IMG_8792

The yogurt I used for this was white, but I added a drop of red food coloring to make it pretty for the picture. Rylin is currently obsessed with pink things and thought it was fantastic. I think I’ll experiment with making our yogurt other colors such as green and orange to help teach colors.

Do you have any clever ways to serve yogurt or otherwise messy foods to toddlers?  I always enjoy tips for feeding toddlers, and have been enjoying the Tyke Bites series at Texas Tales.

hugs!

Amber

P. S. Since the original writing of this post, I began using plain Greek yogurt as a sour cream substitute as a condiment (e.g. over chili, tacos, in veggie dip), to add creaminess to pasta dishes, and in baked goods.  There are so many creative ways to use Greek yogurt in your family’s meals.  In fact, Chobani has an entire site devoted to such recipes!

These recipes are some of our family favorites-

Greek Yogurt Banana Chocolate Chip Muffins

Oatmeal Blueberry Muffins

7 Up Biscuits (for this recipe just substitute the sour cream with Greek yogurt)

Psst- If you can’t get enough of Four to Adore, don’t forget to follow us on Facebook, Twitter, and Pinterest!

And…It’s Valentine’s Day

This week I decided it was FINALLY time to wrap up everything remaining from Christmas. George nagged me enough about our Christmas card display, and I knew our thank you notes were far overdue.  And…it is Valentine’s Day!

I am certainly no Emily Post, but I try to maintain proper etiquette, particularly regarding thank you notes. When someone takes time, effort, and money to purchase and wrap a gift, I want them to know it was appreciated. This year, I thought I’d diverge from our traditional hand written notes, and send electronic versions including pictures of the quads enjoying their gifts.   I started strong.  In the first few days following Christmas I busily snapped pictures and attached them to texts and emails thanking the gift givers.  Then, it became overwhelming.  I started losing track and getting confused so I gave up, leaving about half of our thank you notes undone.

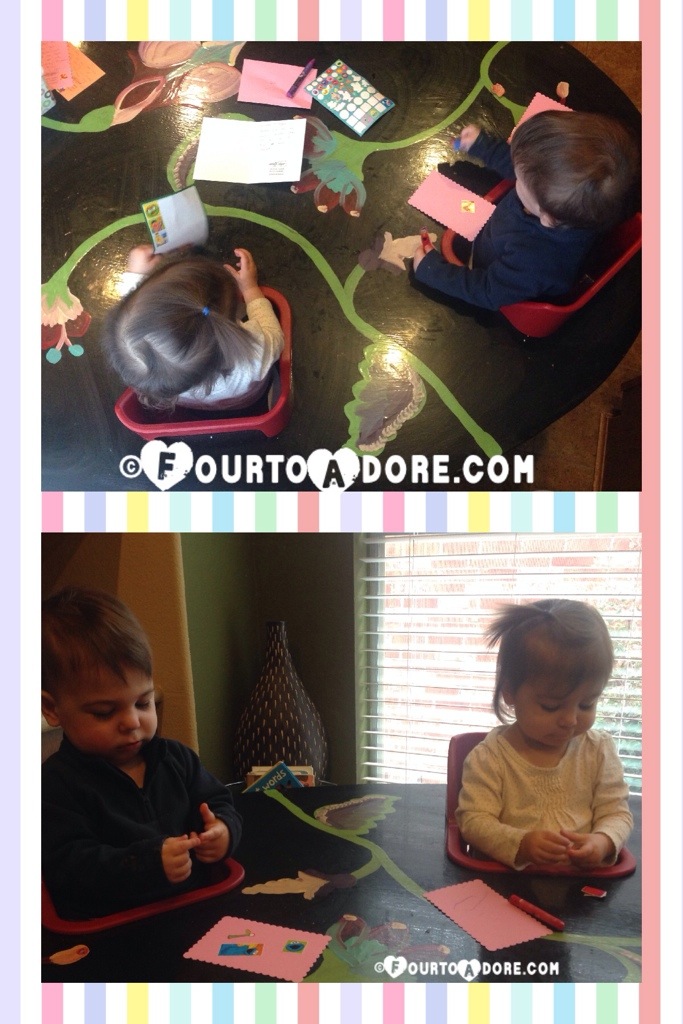
After almost two months, it was high time I finish the thank you notes.  I bailed on my original idea and insead reverted back to traditional hand written paper versions.  Even though these would not come with pictures, I wanted the quads to add their mark.  I wrote a  quick note to each gift giver, then let the quads decorate with stickers and crayons.   In the past, they typically ate both stickers and crayons so I partially expected a futile effort.  However, the quads really enjoyed playing with stickers.  I started by handing them stickers and pointing to the paper and telling them to “stick it”.  It wasn’t long before they convinced me to let them peel the stickers off and place them independently.   I really didn’t give them enough credit, and found our project to be relatively relaxing.  They did, however, munch a few crayons in the process, leaving most of our crayons without tips.

20140213-222403.jpg

20140213-222335.jpg

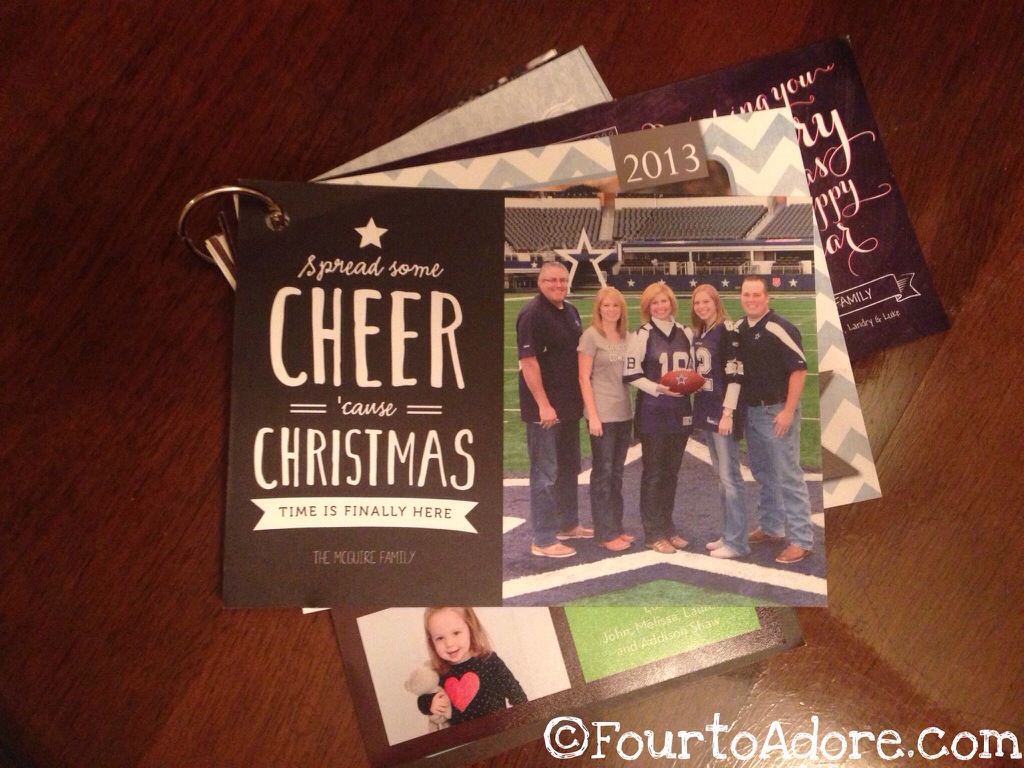
Once we stuffed our mailbox with completed thank you notes, it was time to tackle the Christmas card display.  At the beginning of the Christmas season, we hung a wooden “S” in the entryway with three strips of ribbon dangling from it, then used clothespins to attach cards as they arrived.  Christmas cards are one of my favorite parts of that time of year.  We get updates from our friends and family from near and far, and I enjoy looking back at them all season long.  If it were up to me, we may leave them up until the next year.

20140213-222423.jpg

As I took the pictures down, the quads were given the task of storing the clothespins in an empty wipes box (it’s not my permanent storage place for them, but it was a great toddler task).  Then, I borrowed an idea from a fellow quad mom.  I punched a hole in the corner of each card and put them on a ring, creating a flip book.  Since the quads are interested in learning names and labels, we’ve been pointing out each person pictured as we name them.  Perhaps at our next extended family gathering, or play date the quads will recognize everyone better.   The best part is that our cards didn’t end up stuffed in a storage box indefinitely or worse, thrown away.

20140213-222414.jpg

Now that Christmas is finalized, I suppose we shall take time to show our love for each other in honor of Valentine’s Day.  George and I aren’t the biggest fans of Valentine’s Day so we are keeping it simple.  I’m planning to pick up dinner after work, and perhaps a movie rental.  I also made our favorite sugar cookies in heart shapes for each of my five Valentines.

What do you do with Christmas cards at the end of the season?

Happy Valentine’s Day!

Toddler Tips: #1,120 Don’t Recycle That! (Yet)

With each passing day, I find myself trying to solve some new challenge with raising four toddlers, aka “quaddlers”. They are a cunning lot who inspires a little ingenuity on my part (and George’s) just to manage day to day life. While my ideas are born from being surrounded by four toddlers, I think many of them could be helpful to any parents of little ones so I'm sharing.

With each passing day, I find myself trying to solve some new challenge with raising four toddlers, aka “quaddlers”. They are a cunning lot who inspires a little ingenuity on my part (and George’s) just to manage day to day life. While my ideas are born from being surrounded by four toddlers, I think many of them could be helpful to any parents of little ones so I’m sharing.

Thankfully, our city makes recycling simple.  All we have to do is rinse our recyclables and toss them into a giant bin that we place curbside for weekly pick up.  Consequently, our household waste is drastically reduced and we recycle the majority of what would otherwise be trash.  Now that the quaddlers are fascinated with containers, I let them play with our clean recycleables before dropping them into the bin.  As I cook dinner, I dole out the newest materials and the quads are easily occupied for 20-30 minutes.  But, it doesn’t just occupy them and allow me to cook, they are working on fine motor skills as well.  They open and close flip top and screw top containers, flip and tear magazine pages, stuff containers with smaller ones, and drum with kitchen spoons.   Sydney’s occupational therapist would be proud of the page turning we get with magazines. (She told me that at 18 months they should be turning paper pages one at a time.  We all know what they do to board books so I wasn’t letting them at paper paged books, but magazines meet the same end.) Once they are done playing, I scoop up everything and toss it into the recycle bin.  Super easy!  I am aware of the many toys circulating around Pinterest using these types of things as toys.  However, the quads seem to enjoy the novelty that each day brings rather than using the same containers or materials again and again.   Plus, four babies tend to wear out flimsy plastic and cardboard containers relatively quickly.

20140211-130454.jpg

While I’m on the topic of recycling.  I love re-purposing linen packaging, specifically the clear zip bags used for new sheets and comforters.  They are ideal for storing toys with many parts.  For example, the bag from our pillow shams now houses a few Lego sets, and our old Boppy Pillow bags are fantastic for storing our ball pit balls. All the small parts are contained, and the contents are visible so labels are unnecessary.  Each time we have a new bag like this, I make a point to let George know it’s a keeper.

20140211-130712.jpg

What is your favorite item to re-purpose?

hugs!

Amber


Toddler Tip #457: Shake it up, Baby

With each passing day, I find myself trying to solve some new challenge with raising four toddlers, aka “quaddlers”. They are a cunning lot who inspires a little ingenuity on my part (and George’s) just to manage day to day life. While my ideas are born from being surrounded by four toddlers, I think many of them could be helpful to any parents of little ones so I'm sharing.

With each passing day, I find myself trying to solve some new challenge with raising four toddlers, aka “quaddlers”. Sometimes I think we are taking the “crash course” in parenting.  They are a cunning lot who inspires a little ingenuity on my part (and George’s) just to manage day to day life. While my ideas are born from being surrounded by four toddlers, I think many of them could be helpful to any parents of little ones so I’m sharing.

Not surprisingly, the quads are rapidly becoming picky, toddler eaters.   For the most part they are decent eaters, but lately it’s been a challenge to convince them to eat fresh fruits and veggies.  They even shake their heads and say, “no” when they don’t want to try something.  Also, I often catch them putting undesirable food on the plates of their siblings as they snatch their favored morsels.

Last week, I excitedly borrowed some frugal meal tips from my friend, Becky.  One of her takeaway items was –“Applesaucy Drink”, served in Toss and Take Cups.  It seemed to be a great way to get them to eat fruit, while also promoting oral motor skills (something Sydney and Mason need work on).  I attempted it with the quads the very next day, and they DEVOURED this drink.  The only problem was they the boys pulverized the straws in the process.  Hmmm.  Maybe not a keeper yet.  We shall revisit.   The quads have been using silicone straw cups well for several months, but I suspected they would easily clog with applesauce so I had to think of something else.

Bananas, once the favorite fruit at our house are now a no-go.  Yet, I wasn’t willing to give up on getting the quads to eat them.  After all, bananas are the most inexpensive fruit and easiest to serve and keep.  Using the Magic Bullet, I created a banana milkshake that went through their straws seamlessly.  It was slurped down by all four in a matter of minutes.   I’m not sure anyone bothered to pause for a breath.   Upon finishing his drink, Mason let out a gigantic belch.  This week, I also tried making shakes with frozen berries, but it didn’t go as well.  I think fresh strawberries or mangoes may work so I’ll try them soon.

2-IMG_8496

The Magic Bullet does a fabulous job of making banana milk shakes.  Usually, I just blend banana and milk, but I've also added Carnation Instant Breakfast for extra calories on days they don't eat well.

Baby Banana Milk Shake- 1 cup whole milk + 1 banana

I’ve also added a Carnation Instant Breakfast on days when they didn’t eat well, and I wanted to add calories for the day.  They really lap those chocolately banana shakes up.

You may notice we use Braum’s milk.  That’s because they do not use growth hormone and sell a gallon of milk for about half the price of grocery store organic.  George goes to Braum’s to buy 2-3 gallons of milk twice per week, and he’s now a “regular”.  When they see him, they bag whole milk and hand him an ice cream cone!

For months, I’ve been also successfully using Becky’s idea of “Sneaky Mac ‘n’ Cheese”.  It’s a huge hit at our house.  After sampling part of the quad’s lunch, a friend’s daughter even requested it to be served at her house. I’m fully aware that Becky and I aren’t the first to sneak fresh produce into our children’s mouths.  In fact, there are several cookbooks based upon the principle.  However as quad moms, we are looking for SUPER SIMPLE.  What are your favorite sneaky ways to serve fruits and veggies?

Hugs!

Amber

Toddler Tips #14: Board Book Rehab

With each passing day, I find myself trying to solve some new challenge with raising four toddlers, aka “quaddlers”. They are a cunning lot who inspires a little ingenuity on my part (and George’s) just to manage day to day life. While my ideas are born from being surrounded by four toddlers, I think many of them could be helpful to any parents of little ones so I'm sharing.

With each passing day, I find myself trying to solve some new challenge with raising four toddlers, aka “quaddlers”. They are a cunning lot who inspires a little ingenuity on my part (and George’s) just to manage day-to-day life. While my ideas are born from being surrounded by four toddlers, I think many of them could be helpful to any parents of little ones so I’m sharing.

Because I want the quads to develop a love of reading, I leave book baskets within their reach within in every room where they congregate.  I even keep a basket of them in the kitchen so they can peruse them before and after meals.  Our “basket books” are primarily ones I picked up at garage sales and Half Price Books, or were handed down.  We have our special books located on high bookshelves and we take them down only when an adult can sit and read them, most often at bedtime.

When we finish a meal, I’ll often hear Rylin’s raspy voice whisper, “book” as she signs “please”.  They will sometimes sit for up to 30 minutes flipping through pages of books, examining the pictures, and sometimes even asking us to label things.  It warms my heart to see this.

Photographer, Christina Childress, captured this group shot during their one year photo session.

Photographer, Christina Childress, captured this group shot during their one year photo session.  This is one of my favorite photos of the quads.

5-IMG_7745

6-IMG_7758

However, sometimes I’m convinced that our children are part Billy Goat.  They love gnawing the edges of books almost as much as they enjoy looking at them.  It doesn’t matter how closely we supervise them or how often we redirect this behavior, they are toddlers and they simply chew voraciously.  At first it wasn’t really a problem aside from making books a little less attractive.  After a while, their books were so tattered they’d chomp of bits of them, posing a choking hazard among other things.  The first few times this happened, I chucked the worst books into the garbage.   Then, our collection of board books began to dwindle forcing me to look for replacements.   I didn’t want to spend money on more books I knew they’d find delectable so instead began a repair process.

Here are a few of the books with chewed spines.

Here are a few of the books with chewed spines.

To fix them, I gathered our collection of Duct tape and a pair of scissors.

To fix them, I gathered our collection of Duct tape and a pair of scissors.

Voila!  These books were put back into rotation.  Since the repair, they have chewed the edges a little bit, but they cannot get through the Duct tape and don't seem as interested in Duct tape as cardboard.

Voila! These books were put back into rotation. Since the repair, they have chewed the edges a little bit, but they cannot get through the Duct tape and don’t seem as interested in Duct tape as cardboard.

My desire to repair books began when they nearly finished off our copy of “Yummy Yucky”, which is a family favorite here.  What is your favorite children’s book?

Hugs!

Amber

It’s autumn, right?

This week the Harvest Moon illuminated the sky in it’s orange glory, marking the official start to autumn. Naturally, in Texas no one would know autumn arrived judging by the weather, where temperatures remain in the mid 90’s. We never let the weather dictate how we prepare for the new seasons in our home. Over the week, George and I spruced the place up with some new fall decor, and the babies gave us their hands (and feet) for the cause.

Our attic is stashed full of seasonal decorations, but some of them are getting rather tired and may need to retire. George thought we needed a fall wreath this year and wanted to upcycle a grapevine wreath from the attic. I think fall wreaths are a wonderful way to welcome visitors, but I’ve never found myself good at making them. But, I’m far too frugal to purchase a ready made one. With a little help from Pinterest and a few new accessories from Hobby Lobby, our porch now looks like this-

5-Autumn

I bought a 12″ wooded S, which I coated with Mod Podge then dusted with gold glitter. George actually made the burlap bow and arranged the sprays into the wreath. The owl was found in our attic and we nested him in the wreath for a spooky touch. Since the chevron on the bow is green, I am thinking of later converting this wreath to a Christmas one by switching out the sprays and owl for other accessories. The pumpkins on the porch were old faded plastic ones in storage that got the same bedazzled treatment as our S.

Recently we’ve had a problem with delivery drivers, solicitors, and even neighbors ringing the door bell just as the babies drift off to sleep during nap time. There is not much worse than getting four babies to sleep only to have a door bell startle them and spoil the peace. For a while, we had a paper note taped to our doorbell, but it wasn’t attractive. George replaced the paper sign with a barn wood frame and wood panel stating, “Knock softly babies sleeping.” Because George is an over achiever, he wanted to make an additional sign with a quote that is meaningful to our family.

There is a wonderful story behind the quote, which George will happily share with anyone who wants to inquire.

There is a wonderful story behind the quote, which George will happily share with anyone who inquires.

Inside, I tossed some spray painted dry gourds into an orange basket for a fresh fall centerpiece. Then, I used the extra burlap ribbon from the wreath to adorn our mantle along with my favorite pumpkin collection and scarecrow.

2-IMG_6721

4-IMG_6726

Finally, the babies helped us create a Halloween masterpiece with their hands and feet.

6-Autumn1

We used black foam board cut into smaller sections as canvas, and I connected them with grosgrain ribbon from our gift wrap box. Harper’s hands created the spider, Sydney’s feet created the candy corn, Rylin’s hands made the skeleton hands, and Mason’s feet became ghosts.
We chose to hand the babies’ art work adjacent to the quad table, and they enjoy admiring it during mealtimes.

The kick off to fall is never complete without a pot of chili. This year, I wanted to try my hand at Crock Pot chili since our slow cooker is my new favorite kitchen appliance. I perused our pantry and came up with my take on Green Chicken Chili.

Green Chicken Chili Dump these ingredients in the Crock Pot: 4 chicken breasts, 1/2 box chicken broth, 2 cans green enchilada sauce, 1 can rotel, 2 cans corn drained, 2 cans white beans (rinsed and drained), 8 oz cream cheese.  Cook on low 6-8 hrs or on high 4 hrs.

Green Chicken Chili
Dump these ingredients in the Crock Pot: 4 chicken breasts, 1/2 box chicken broth, 2 cans green enchilada sauce, 1 can Rotel, 2 cans corn drained, 2 cans white beans (rinsed and drained), 8 oz cream cheese. Cook on low 6-8 hrs or on high 4 hrs.

What do you do in your home when fall arrives?

Hugs,

Amber

How do you make a tissue dance?

Put a little boogie in it!

Sorry for the lame Laffy Taffy joke….I couldn’t help myself since this post is about baby boogies.

Thanks to our lock down efforts, we did not have a sick visit to the pediatrician until after the babies’ first birthday. Now that we are past the days of lock down, we are venturing out to new places more frequently. Naturally, that means we’re exposed to germs, and sick babies are inevitable. As much as I’d love to protect the babies forever, we cannot and will not live within the confines of a bubble. I want the babies to experience childhood fully and as normally as possible so out of our bubble we’ll go.

George will probably not like this picture being posted, but it's the only one taken at our very first sick visit.  We had to take Harper to the urgent care clinic on a Sunday afternoon when he had a double ear infection and nasal congestion.

George will probably not like this picture being posted, but it’s the only one taken at our very first sick visit. We had to take Harper to the urgent care clinic on a Sunday afternoon when he had a double ear infection and nasal congestion.

While the average baby contracts about eight colds within the first year of life, our babies are just now experiencing their first legitimate cold. It’s not the worst cold ever, but there are copious amounts of despicable snot. With tons of nasal suctioning and tissue wiping, the babies noses became raw and irritated. I decided to try my hand at making nose and face wipes to solve the problem.

I simply used the same recipe we use for baby wipes and swapped out the traditional baby wash for Johnson & Johnson’s soothing vapor wash (it contains soothing rosemary, eucalyptus, and menthol) and added a few drops of tea tree oil to soothe the raw areas.  The batch cost me about $.50 and they are fantastic! I realize that many people are hesitant to try home-made items, but honestly these are a cinch. If parents of quadruplets can find two minutes to make them, most anyone could.

DIY Boogie Wipes recipe: Cut one Viva paper towel roll in half and stuff into a cylindrical container.   Whisk together 1 1/2 c. water, 1 tbs soothing vapor bath, 1/2 tbs baby oil, and 2 drops tea tree oil. Pour mixture over the paper towel roll. Pull cardboard from the center of the paper towels. Voila!

DIY Nose and Face Wipes:
1. Cut one Viva paper towel roll in half and stuff into a cylindrical container.
2. Whisk together 1 1/2 c. water, 1 tbs soothing vapor bath, 1/2 tbs baby oil, and 2 drops tea tree oil.
3. Pour liquid mixture over the paper towel roll.
4. Pull cardboard from the center of the paper towels.
Voila!

For step by step pictures of the process, check out our baby wipes recipe, then swap out the baby wash for soothing vapor wash.  Simple!

What home remedies do you use for colds?

hugs!

Amber

P.S. For baby wipes, I prefer to use Bounty paper towels because they are strong.  However, for noses, the Viva paper towels are much softer and gentler.  Also, the soothing vapor wash is only recommended for infants over three months of age.

It’s a 10 Pin Kinda Day

Today my favorite sister, Courtney, and her partner puppy in crime, Stella, spent the day with me.  We decided that since I have been nowhere near a spa in ages, it was time for beauty treatments.  So….we found 10 cool DIY projects to try today.  Here’s what we did today:

1. Courtney put my hair up in a braid to keep it out of my face.

2. Courtney created a cute retro style head wrap to keep her hair back.

3. We made some refreshing watermelon mint water.  All you do is muddle a sprig of mint with a few scoops of watermelon in a mason jar, add ice, then fill the jar with water.  Finally, shake well!

muddlin’ mint and watermelon!

4. We needed lids for our watermelon water (since I am now a total slob!) so we put a piece of paper under the lid and poked a hole in it for a straw.  The Pinterest version uses cupcake liners, but we didn’t have any so we improvised!

5. We made some lavender mint hand/ foot scrub.  The original recipe calls for a different scent of soap, but we had lavender, which smells divine and added a few drops of mint.  All you do is put sugar in a mason jar, mix in Dawn soap with Oil of Olay and mix well.  Then, scrub your hands and feet until a nice lather forms.

6. Next, we made a simple facial mask with water and baking soda.  So easy!  It exfoliates and removes blackheads very well.

7. While our masks set, we moisturized our hands with an olive oil honey serum.

8. Then, no surprise, I got hungry!  So…we made delicious, creamy Nutella cool whip Popsicle.  We just blended 1/2 c. milk, 3 tbs. Nutella, and 1 c. cool whip in the blender the poured them into Popsicle molds.

9.  Well, the popsicles had to set so we had some microwave popcorn to tide me over and in the meantime, did a spice mask.  We simply mixed cinnamon, nutmeg, and honey and rubbed on our faces.  Nutmeg and honey act as natural anti-inflammatories, which can reduce swelling and redness in skin. They’re also great for soothing acne scars and preventing infection. In addition, the nutmeg and cinnamon also work to exfoliate your skin when you wash this mask off.  And…if a little drips near your mouth, it tastes great!!!!

10.  Finally, it was time for my pedicure!  Since I haven’t been able to reach my toes in weeks and I can’t go to a salon, Courtney gives me a pedi every two weeks.  Such a sweet sister!  This time we did “mermaid toes”.  Courtney buffed and trimmed my toe nails as usual then cleaned the oils off with rubbing alcohol.  She then painted two coats of Essie “Turquoise and Caicos” nail polish on me.  She topped it off with two coats of Essie Luxe “shine of the times” and now I have shimmery mermaid toes!

We really had a wonderful day!  I am so blessed to have Courtney as my sister.  I hope our girls are close like this when they are older.  And, I hope they are close to their brothers too!

These DIY projects were fun, cheap, and easy.  All worthwhile!

hugs,

Amber

Diaper Chute

I guess I couldn’t let my wife steal all the glory so I decided to show off a little.  As we know “It is all about me.” – that’s a little inside joke.  As my wife turns to words for comfort, I turn to building and creating with my hands.   A guy can nest too, right?  If there is one thing you need to know about me it is that I was born with Anosmia;  it means I cannot smell a thing.   Not a rose, popcorn, a slow roasted Texas Brisket or a dead skunk.  Nothing.  It really hasn’t affected my life except of course for my cleanliness.  I like to keep everything as clean as possible to make sure it doesn’t stink.  I have noticed that people who can smell mention that things smell good 5% of the time with bad smells representing an overwhelming 95%.  I presume the world is full of bad smells but this is just an observation.

This brings me to my creation…The Poop Chute.  Who has a poop chute you ask???? Nobody except the Shawvers!  I just cannot believe anyone would allow poop to be in the same place they eat and sleep. It just does not make any sense to me.  I asked many people how they dispose of diapers and the only logical conclusion is a Diaper Genie or Diaper Champ.  These devices were created years ago and I am surprised nobody has come up with something better. Since we are expecting four I did not want to keep emptying these devices all day long to keep the stink away.  I needed something where they all go and I can change once a day.

Below I show how I built my work of art.   I simply used small pet door and a duct which can be purchased at any local hardware store.

This is a small 6X6 pet door purchased for about 20 bucks

                                      I had to bend this duct to the proper shape, pointing downwards.                                                   This is a 10" vent pipe elbow purchased for about 12 bucks  Next, I  cut out an opening in the wall to accommodate the pet door on one side.  On the other, I cut and traced out a 10″ hole to insert the duct into.

This is the door on the inside. You place the diaper in here.

This is the door on the inside of the nursery closet. You place the diaper in here.

This is the duct from the inside of the garage.  The diapers fall out of this chute into a waiting trashcan placed underneath.  I will line the trashcan with charcoal to absorb the odors.  I will simply step out of the car, take out the trash, and Voila!  It’s a nice way to dispose of dirty diapers in a convenient centralized location!

BTW….I also invented a previous product that I used to potty train our puppy while living in an apartment.  We called it The Pooch Patio Potty.  I put a layer of sod in a soil lined box for the puppy to use.   It worked great!  Sasha was able to potty right on the balcony without making a mess and we didn’t have to haul her down three flights of stairs each time she needed to go.  However, someone else later made something similar with Astroturf and now sells them at Bed Bath and Beyond!  My million dollar idea gone in an instant.

George

Mission Organization!

When we bought our house six years ago, we thought we’d grow into it, but we had NO idea how much.  In six years time, we’ve done a lot of stuff collecting.  That means both spare bedrooms and their closets were filled to capacity.  That does not make for good nurseries, especially not shared nurseries.  George was willing to part with his exercise equipment and sold all of it on Craigslist, but the closets were still full of photos, gift wrap, miscellaneous junk, camping gear, and the list goes on.  We cleaned out as much as we could, but the stuff still had to go somewhere.  It migrated to our upstairs room where it sat for weeks.  While no one that visited our house saw the enormous pile, we both knew it was there and we had lots of stuff that needed a home.  It caused that annoying nagging feeling within us.  So, we went on a mission to tackle it this weekend!  Thankfully, George is a good fantastic carpenter.  He expanded the shelving in all of the closets in our house, including the pantry and laundry room.  These expansions helped us to store more stuff than before, but it would not contain everything.  We then found cabinet kits at Lowe’s for our upstairs room.  By the time we headed to bed last night, all of the stuff had found a new home (besides the nurseries) and it no longer consumed our home.  It gave us both a sense of preparedness and control over things that we can actually control, which felt great!  Now we can focus on important stuff like outfitting the nurseries!  If we only knew what colors to choose….

hugs!

Amber

This slideshow requires JavaScript.